

So I finally got about to installing the OBU on my 2018 Hyundai i30.
Like many others, I had intended to wait it out as long as possible. But with the hope of a revised design being rolled up being close to none, and having recently received the LTA’s letter of ultimatum to upgrade by September 2025, I decided to “take the L” and got it installed over the weekend.
The Three-Body Problem
The OBU, at least for cars, is a three piece system comprising the antenna, processing unit and display. The older IU (especially the slim mount version introduced in 2009) seems comparatively elegant in design.
The biggest criticism with this three-piece system is the placement of these three pieces in the car.
The processing unit, which also houses the CEPAS CashCard, is mounted at the passenger footwell by default. It’s not an ideal placement, especially for cars with a raised centre console stack, where you’d likely struggle to reach for your CashCard. There are alternative placements available, but most aren’t ideal because of the heat generated by the processing unit. It gets warm — we’ll come to that in a bit. Together with its mount, the processing unit itself is quite large, about comparable in size to the second version of the IU. The best possible position is probably below the centre armrest — but this only applies to certain cars which have a floating centre console.
The display, being mounted on the bottom right of the car’s windscreen by default, is another area of contention, with its size creating a sizeable blindspot. With its giant bezels and poor screen quality, it looks like an in-car GPS unit from 2010, with the user interface elements befitting that era.
The antenna, while being a square block also mounted on the bottom right of the car’s windscreen, has somehow emerged largely unscathed from criticism — perhaps because there are bigger fish to fry.
Whatever the case, one has to eventually get it installed anyway, unless you’re one of those cars on the Classic Cars Scheme, and so I decided to take a plunge.
Installation Process and Finding a Suitable Workshop
There are a list of installers available on the LTA’s website. I did a quick Google search for workshops with higher ratings and found a few that are rated highly, but you would probably need to book a week or two in advance if you’re planning to get it installed on a weekend. Weekday slots appear easier to secure, but it’s unlikely that you can just ‘walk in’ these days.
In the end, I opted to go back to my car’s authorised dealer, Komoco Alexandra, to get the OBU installed. The installation for me took about 4 hours, although I opted to collect the car only at the end of the day.
With any installation, you will receive a complimentary NETS Motoring Card (no stored value, of course), which the government decided to give out to address complaints about the placement of the processing unit. Some workshops even go further and beyond and provide freebies such as an OBU cover.
Whatever workshop you choose, it is imperative that you go through the placement of the processing unit and the display unit with the installer. The processing unit gets uncomfortably warm to the touch after a while, so if you’re placing the unit at the passenger or driver footwell, you should ensure that it is installed in a position where your legs don’t come into contact with the processing unit as much as possible. For my car, I installed

For my car, I chose to have it installed at the passenger footwell, but at a position where my passenger’s right leg is unlikely to come in contact with the processing unit under normal seating conditions. Do note that if you’re installing the processing unit at the driver’s side, the unit would need to be mounted on with screws and bolts. No thanks, LTA.
As for the display, the default placement is at the bottom right corner, with the display intended to cover the antenna unit. Certain workshops may be able to help you relocate the display to the top of the windscreen, with some enterprising workshops even selling a 3D printed slim-fit OBU mount to make the display more flush against the top of the windscreen. Do note, however, that you will still have to deal with a small blind spot at the bottom right of the windscreen where the antenna is — it doesn’t seem like the antenna unit can be easily relocated.
Living with the OBU
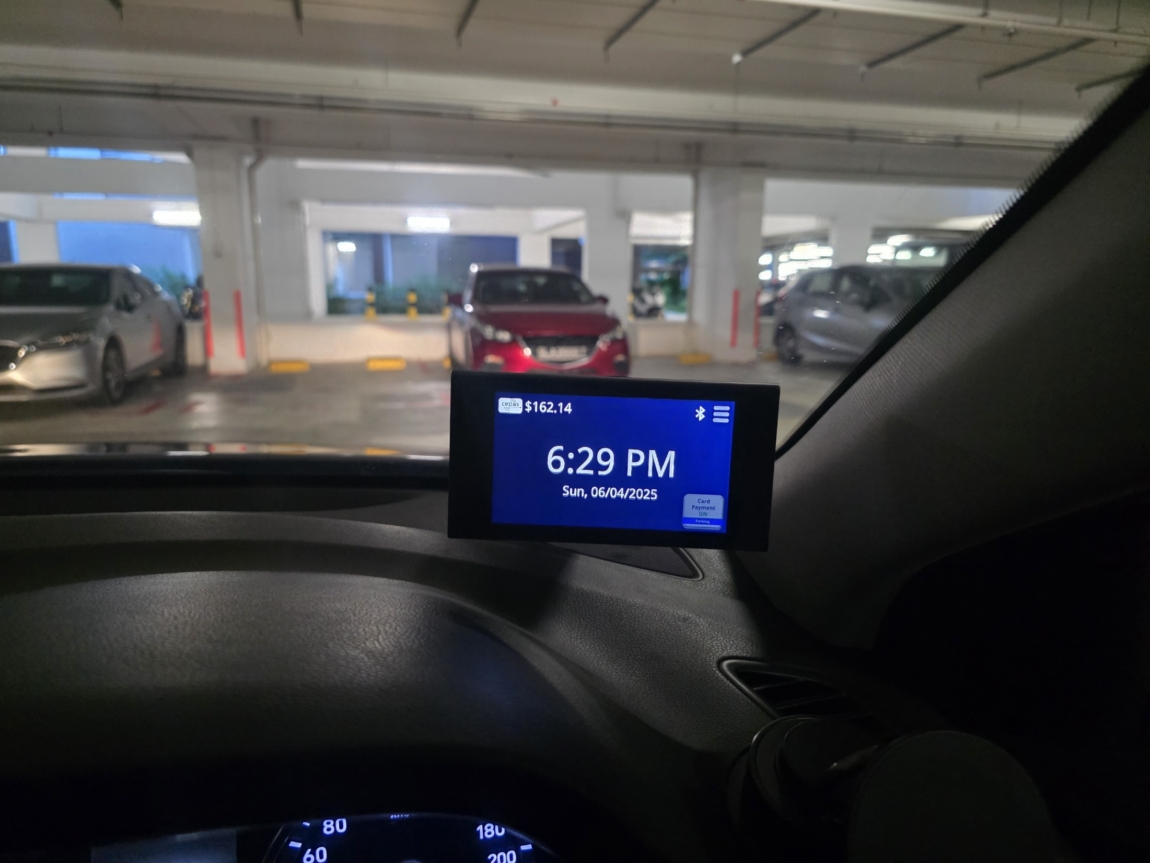
The display of the OBU looks right out of 2010, with large bezels befitting that era and the black background adopting a blue hue when viewed slightly off-angle. The most useful function of the display, as of now, is that you can toggle the card payment functionality with a single tap of the screen, without having to remove your CashCard from the processing unit. It comes with a caveat, however — for safety reasons, the touchscreen is disabled whenever the GPS antenna has no signal, or when the vehicle is moving. The unfortunate side effect of this is that in underground carparks, you may find yourself not being able to toggle on/ off the card payment feature. The only workaround for now, as I was told when I wrote in to LTA, was to restart the car — apparently, after a restart, the touchscreen functionality will work again until you reach an area with GPS signal.
Tapping the hamburger menu icon allows you to toggle the time and date functionality as well as to adjust the display’s brightness and the processing unit’s volume. The display allows for two brightness settings — one for day and one for night — but is fixed based on timing rather than ambient brightness. At mid levels, I had no issues with brightness in the daytime. This brightness setting is an acceptable compromise during the day — setting a brightness too high will get somewhat irritating when you’re in a tunnel or an underground carpark.
Apart from your CashCard’s value and the date and time (the latter of which can be disabled in the setting if you’d like), the OBU also lets you know if you’re in an area with a bus lane and shows expressway timings (basically a duplicate of the electronic signboards you see before entering an expressway) and parking spaces in the city area. There’s supposedly a feature coming where you can use it for roadside parking as well without invoking the Parking.sg app — I guess that last step will come next year when the OBU is fully implemented, and they would probably phase out paper coupons thereafter.
The processing unit has a beep feature, but apart from the beep whenever you pass by a gantry (as with the old IU), this same beep will also sound whenever a notification (e.g., bus lane or expressway timing) arrives, which gets annoying after a while. In the end, I chose to disable the beep altogether, which felt a little strange at first when you’re at carpark gantries and may be a little inconvenient in situations where the carpark gantry’s sensor isn’t sensitive and you need to adjust your car accordingly.
In my opinion, the display could have been far more useful, say, if it can incorporate traffic notices (e.g., if there’s a breakdown on a particular expressway) and inform you of the speed limit.
Much has been said about the display forming a giant blindspot. However, I got used to it after a while (do note that my car’s windscreen is also quite angled and far away from my dashboard, so it may possibly form a bigger blindspot if your car has a more vertical windscreen) and the angle of the ball mount can actually be adjusted quite flexibly. Some people have however opted to relocate the display to the top of the windscreen instead. I opted not to do so, since the antenna is already there and forms another blind spot anyway.
Possible “Mods” to the OBU
There are some (legal) modifications one may find helpful for the OBU. For me, the best quality-of-life improvement was installing a privacy screen protector on the OBU. I purchased an iPhone 16 Pro Max privacy matte screen protector from ShieldMonster on Shopee. The width of the iPhone 16 Pro Max is very similar to the height of the OBU’s screen, so it made for a good match — you just need to trim the length a little bit. The privacy screen protector completely eliminated the reflection of the OBU’s display on the car’s windscreen in dim areas (like in carparks), and reduced the “blue background” effect of the OBU.
I also bought a CashCard cover on Shopee for the processing unit. The cover serves two purposes — one, to hide the fact that you have a CashCard inserted, and two, to allow you to remove your CashCard more easily. As you can see from the earlier image above, the CashCard sits on the inner side of the processing unit (near the car’s sidewall). This makes it difficult to “grip” the CashCard especially if you have fat fingers or short fingernails. The CashCard cover has a “slot” where you can insert the CashCard into, and thereafter you can simply pull on the entire cover to insert/ remove the CashCard more easily. Alternatively, if you’re ok with your CashCard being exposed, you can simply put a piece of sticky tape over the CashCard to form a “tab”.
Very annoyingly, the OBU display has a white QR code sticker on the back, which causes a very distracting reflection on my windscreen if the display is tilted downwards. To solve this, I taped a small piece of dark-coloured cardboard to cover the QR code.
Lastly, many workshops are now offering a custom, 3D printed bracket that allows you to mount the OBU display on the top of the windscreen (just do a quick Google search for a “slim OBU mount” if you’re interested). This involves the removal of the ball joint bracket (which requires a “Y” screwdriver) and re-routing the wires of the display through the dashboard trim. The price of such brackets (including installation) is quite hefty though (a quick search reveals that the cost is about $68 to $98). If you’re game, you can instead DIY your own mount (with strong double-sided tape) with the help of this rear camera bracket mount. While I was seriously contemplating the relocation of my OBU display at first, I opted to retain it at its default position instead in the end (since there’s already a blind spot there caused by the antenna).
Conclusion
I’ve been using the OBU for about a month now. The experience for me so far has been pretty ok and it has not malfunctioned or anything. Sure, it’s bigger than I would like and the placement of the display and processing unit may be problematic for some cars, but with careful pre-planning, there’s nothing to “fear” about installing the OBU. In fact, given the long lead times nowadays (VICOM, for example, has its slots all filled out for the next few months), it might be better to just get it over and done with.
Not being able to have the option to turn off the screen is a real problem for me. I don’t need another big display showing clock functions etc. Was in a car with the new system kept on beeping. I do hope I’m able to switch that off.
Would you have considered installing the screen in the sun visor where it’s out of sight?
Yes, although in my case I got used to it. I am actually designing a 3D printed sliding mount where you can mount the OBU on the sun visor and have it easily removed in case you need to replace it etc. I have also designed a cover that covers the whole OBU except for the cashcard amount to make it less distracting.
Would you be keen to try this? I’m looking for testers.