

So, you’ve collected your keys to your new Build-to-Order (BTO) flat after an excruciating long wait (or shorter, if you were lucky enough to secure one via the Sale of Balance Flats scheme). Before you commence your renovation works, it’s important to carry out a defects check so that any major issues can be identified and rectified, preferably before renovation commences.
What’s a Defects Check?
Every new BTO comes with a one year defects liability period, which is essentially a warranty provided by the HDB to correct any defects reported during the period. During the first year, there will be a Building Service Centre (BSC) office set up by the project developer at the void decks of one of the blocks. One purpose of the BSC office is to coordinate the defects check process and to provide you with an avenue to report your defects. Typically, you are advised to report defects within one month of collection of keys, although I believe they should entertain any request for rectification as long as it is within the one year period and before you commence renovation.
Defects checking involves checking the entire unit for defects and flagging them out for the BSC team to rectify. Examples of functional defects incude water ponding, poor drainage, poor water flow, loose switches, loose door stoppers, improperly aligned tiles, stuck door knobs and misaligned door frames which makes it difficult to lock the door. In my estate, there were also issues of water seepage from the exterior facade, which the homeowners only realised after the torrential rains earlier this year. In dry weather, this may be difficult to detect, although certain professional defect inspection firms may have the expertise to detect such issues.
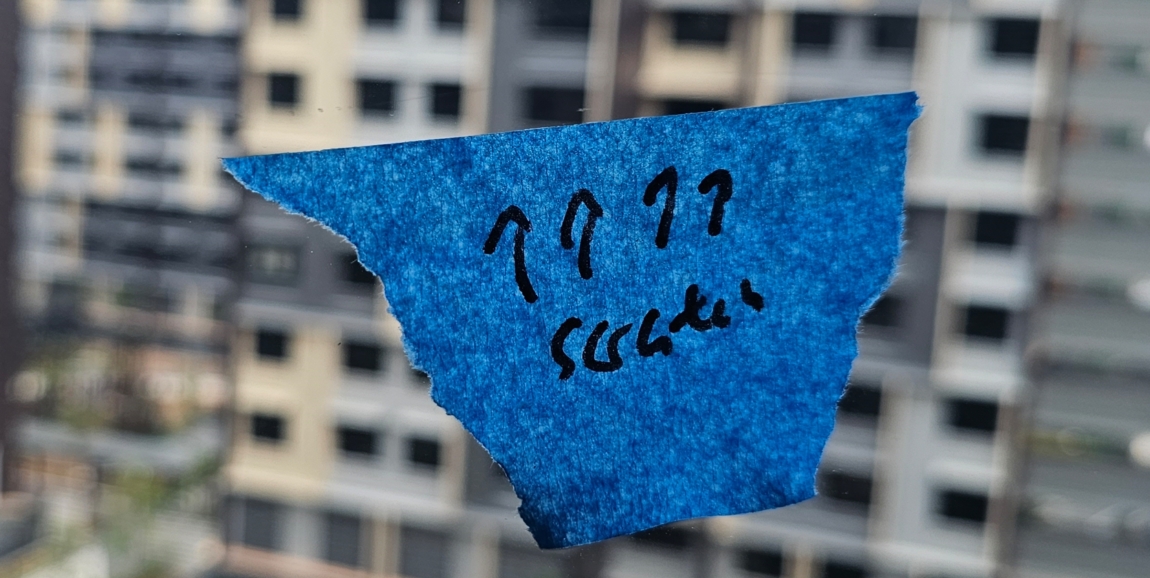
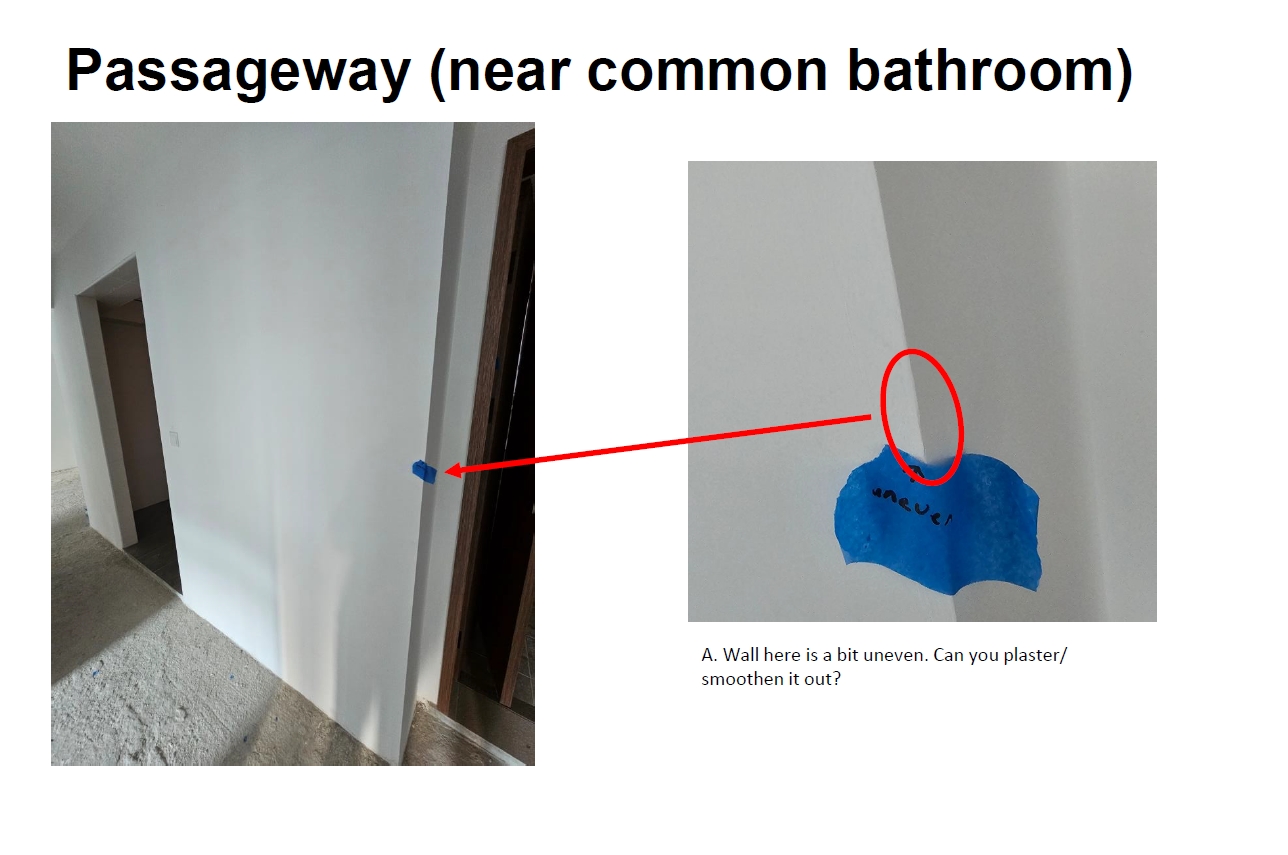
You can also point out cosmetic defects and the BSC team will try to fix them to the best of their ability. Common cosmetic defects include dents and scratches on window frames and window glasses, dents in doors, holes in the door frame, uneven painting and walls that do not look very straight.
The defects checking process involves three main stages. The first stage involves checking for defects and marking them out using painter’s tape. The next stage involves reporting the defects to the BSC and carrying out the joint inspection. The third stage involves the rectification stage and signing off after the process has been completed.
Stage 1: Checking for Defects
A common question that surfaced in my estate’s Telegram chat group was — should I engage a professional defects checker? I think the answer depends on how particular you are about minor defects. While there are online checklists that tell you roughly what to look out for, it may be difficult to pinpoint certain issues without the relevant expertise, or you may be left wondering whether certain issues you have flagged out are “normal”.
If you go down the route of engaging a professional defects checker, my recommendation would be to go for one of the two prominent players in the industry, Absolute Inspection and Advanced Inspection. Their slots fill up very quickly, so we would suggest booking an appointment as soon as you know your key collection date.
Unfortunately for us, we were not able to secure a proper timeslot until a month later and so we went with SG DefectScan, which is a relatively new player in the market. Overall, despite charging the same price as Absolute and Advanced, we did not feel that SG DefectScan was very detailed and we ended up spotting several issues which they had missed out, which resulted in a bit of back and forth between . In my opinion, either pay for the best or don’t get one at all.
Alternatively, you decide to check for defects on your own, my recommendation would be to buy painter’s tape to mark out the location of the defects and a set of markers. Painter’s tape is easy to tear without scissors and the adhesive is gentle enough that it should not damage existing finishings when it is peeled off later. Then, use the markers to write on the tape so as to point out the exact location of the defect and the type of defect, which will make it easier for you and for the BSC team. Post-it tags will also do in the absence of painter’s tape, but from my experience, they tend to drop off easily. It’s also helpful to bring along a powerful portable lamp (such as a camping light) as some defects may not be easily visible in the absence of proper lighting.
Also, bring along a phone charger to test whether all your power points are working. If you want to test your network points (note: some defects checker firms do not check for network points as part of their checks), you can easily buy a network tester for under $15 on Shopee and do the test yourself.
After checking for defects, remember to take photos of the tags you have placed so that you can confirm that the defects have been rectified later on. When you reach home, compile the photos into a file (a PowerPoint file works best from my experience) and organise each page/ slide based on the areas where the defects were found.
Stage 2: Reporting the Defects
The next stage would be to report the defects to BSC and arranging a joint site appointment with the BSC site supervisor to run through the list of defects. You can arrange for an appointment via scanning the QR code placed in your unit and filling up the form; alternatively, you can also access the online form here. It is best to schedule your appointment as soon as possible as available slots generally fill up very quickly.
During the joint site appointment, the site supervisor will run through the list of defects with you. If you have hired a professional defects checker, the defects checker would most certainty be present at this appointment as well. While the BSC may attempt to tell you certain things are “normal”, be insistent if it is something you cannot accept.
After the joint site inspection, I would recommend dropping the BSC team an email with the complete list of defects (this is where the PowerPoint file mentioned earlier comes in useful — be sure to PDF it before sending it across).
Stage 3: Defects Rectification
The official line from HDB is that it would take about 14 working days for the defects to rectified and the BSC team would call you once the defects have been rectified. Based on our experience, provided that the BSC team is not too overwhelmed, the initial batch of defects should be rectified within less than two weeks. You may wish to call the BSC hotline after 2 weeks if you do not hear anything; it could be the case that the defects have been fixed but they have not had the time to call you yet.
It would perhaps also be good to inspect the unit every few days or so. If you notice stickers going missing, this means that they have “rectified” the issue. The reason why “rectified” is in inverted commas is because in certain instances, the person responsible for that particular defect may not notice the issue (or think that you are referring to another issue especially if your tag is not very specific) and proceed to remove the tag. If you feel that the issues have not been resolved to your satisfaction, be sure to highlight them to the BSC team — again, taking photos of the unfixed defects and documenting them down in a file to be sent across to the BSC team via email can come in really useful.
Once all the defects have been suitably resolved, arrange another appointment with the BSC team to go through the list of defects and point out any remaining defects that have not been fixed. Once again, at the end of this appointment, it is helpful (to you and both the BSC team) to send across the updated list of defects so everything is well documented.
Nothing is Perfect
Unfortunately, despite their best attempts, it is possible that the BSC team may not be able to adequately resolve each and every issue. If you feel those issues are minor or will be rectified in the course of your renovations (for example, if there’s uneven plastering over a wall which you are intending to tear down anyway, or if you notice dents on a door which you intend to replace), it may be best to ‘let it go’.
Windows are generally a problematic area as you can no longer replace windows easily as with older HDBs, and it is also where most cosmetic issues surface, such as dents and scratches.
While the window glass can be replaced by the BSC team if needed, it is probably not feasible for them to replace the window frame as it already comes in prefabricated form. The most they can do is some minor touch-up with spray paint, but even then, it is difficult for them to cover certain defects such as dents and the such, and oftentimes, attempting to fix them may make things worst — they may inadvertently scratch your glass while trying to sand down imperfections on the window frame, for example.